
Wednesday, October 29, 2014
Monday, October 6, 2014
#TeamFabulous
When in the/who in the/what in the/ why/ and where in theeeeeee heck is Team Fabulous?!

When: #TeamFabulous was created in the Winter of 2013 when the realization that two very fancy girls had something extra fabulous going on! It started with boudoir specials that lead to ideas and more ideas of collaborations and projects. It is safe to say that #TeamFabulous is becoming not only a brand but a MOVEMENT. We got the powaaaah!
Who: #TeamFabulous is made up of two mini size divas- Me (Jessalyn) and Shauna, the owner and solo operator of Kreativ Studios Photography & design. We are fun, funny, fantastic, and we make YOU feel down right FABULOUS. We have NEVER and I mean EVER gotten any negative feed back. What we mostly hear is about how much FUN and how comfortable their time with us was! We make you feel like family. Basically shoots with us are just another girls night out ;)
What: #TeamFabulous photo shoots are collaborations between Kreativ Studios and Makeup by Jessalyn. Most #TeamFabulous shoots are specials that we host together that include hair, makeup and photos (of courses) for Holiday Shoots, Boudoir, Senior Portrait or any other fun ideas that our silly yet creative brains come up with. You may have seen our Pin-Up shoots, Mermaid shoots, Fairy shoots, or Halloween shoots floating around the web and in art culture magazines.
Why: I mean... if you aren't convinced already why you would/should choose #TeamFabulous maybe you need to re-read sections Who & What about #Team Fabulous. I guess I could summarize by just saying we are the most FABULOUS.

There you have it! Now you know most of what makes #TeamFabulous :) for more info & to stay updated on our latest and greatest adventures I HIGHLY suggest you follow both of our pages on Facebook:
Kreativ Studios & Makeup by Jessalyn
Hugs, Kisses, & Fabulous sprinkles
Friday, August 29, 2014
Glitter Shoot With Kreativ Studios & Alana


This has got to be my favorite #TeamFabulous photoshoot so far. Mostly because I love glitter. We couldn't have found a better model for this shoot, so thank you VERY much for being part of this shoot, A! And obviously thank you Kreativ Studios for always beautifully executing our crazy ideas we come up with xo


2 Steps You Might Be Missing
Caution for those of you with motion sickness because you're about to get blown away! (haha)
 No brows/ no lashes
 No brows/ added lashes
  Lashes & brows! Big difference!
Also for those of you with sensitive stomachs especially if you've never seen me without my brows did!
Not all but some of the models and brides... Mostly brides are afraid of 2 things in particular: brows and lashes. These two steps could change your dolling up game drastically. Especially in photographs. Let's face it ... We all have that one friend that whips out her camera every girls night! (In my friends case that friend is me) Don't be the weirdo with no brows!! If you already have nice beautiful bold and shapely brows you may not need this.
The second step you may be missing out on are the lashes! I have posted previously about how to apply falsies. Lashes make a HUGE difference in your pictures (brides I'm talking to you!!)
Now, am I right? Or am I right?
Friday, June 13, 2014
MAC NEWNESS!

First off is MAC Alluring Aquatic collection. Because of the mermaidness I of course bought everything. I am The Makeup Mermaid, afterall. I love everything. The only thing I don't love is how small the eyeshadows are. They're quite a bit smaller than MAC's normal lipstick and cost more WTH? If there is anything at all left from this collection at your mac counter or online I suggest you at least grab at least one item from this collection. I truly love it all.
Next we have Kelly and Sharon Osbourne for MAC. I love Kelly's matte lilac packaging. By the time I got to the website to pick something out most was sold out. I would of loved Kelly's lipsticks but they were ALL sold out! What I was able to grab was Sharon's Bijou lipgloss its the ultimate perfect neutral gloss. I also bought Kelly's eyebrow palette, it will be a great addition to my kit because it is very universal as far as mixing colors to match almost anyone's brows. I also would have liked to get Kelly's 183se buffer brush but that too was sold out. As far as the nice shadow quads- those mac always has, so no rush to purchase there. If you are in need as great natural look shadows these would be for you!

Summer Must Haves!

Here is a fun little summer essentials shopping list :)
1) My favorite on the list!

Buxom Divine Goddess Luminizer
Why its so awesome for summer:
Paired with your awesome tan this cream gives off incandescent glow and the radest cooling sensation! Purchased at Sephora
2) This one is kind of a splurge but TRUST me its worth the $36

Dior Addict Fluid Stick
It’s lightweight in texture and delivers long-lasting wear! It applies like a lipgloss but the color pay off and texture is comparable to a creamy bold lipstick! My favorite for summer is called Adventure (not pictured) it is an orangey red. Purchased at Sephora or your local Dior counter
3) My favorite brow product that I have mentioned in many other posts

Makeup Forever Aquabrow because it stays! No additional explanations needed xo Purchased at Sephora
4) Fabulous & Affordable waterproof mascara

Maybelline Volum' Express Pumped Up! Colossal Mascara. I am a sap and sometimes I cry when my brides cry. I have not seen this mascara move people! It's a good one! Purchased at drug store
5) Another all time favorite!

Set it don't fret it! This setting spray is a gift from god. It sets it all and you need it! This my friends is a summer must! The sprayer delivers a microfine mist that goes on so light, you’ll hardly feel it—and once you’ve applied it, you won’t even know it’s there. Purchased at Sephora or Ulta
Wednesday, May 14, 2014
Excuses and Explanations
Hi everyone!

Sorry I have been nonexistent lately. You'd think not being chained to a desk for 40hrs a week would give me plenty of time to blog, but au contraire! I've been super duper busy! Now that it's spring we are in ✨wedding season✨ Besides all my beautiful brides, everyone else is coming out of hibernation, and Kreativ Studios Kreativ brain is pumping out dozens of fabulous ideas for shoots! The nicer weather brings lots of fun projects! It also brings lots of me not wanting to be inside :)
If you don't follow my facebook page already: Makeup by Jessalyn, you might want to jump on that wagon because that is most often updated with my latest makeup projects, you can also stay updated on all the beauties from the weddings I've been doing!
Sorry again for hiding! I don't mean to! Next week there will be a Mer-tastic blog post on MAC Alluring Aquatic collection! That will be fun! ❤️
Thursday, March 27, 2014
Painterly Fun!

As promised! New post on my favorite new addition to my kit! Now I literally have every lipstick color possible!!! Mua-hah-haaa!

This is exciting stuff: You can get it for $29 at Sephora!
Awesome little kit for creative brains. Originally I had planned on creating a bunch of possible combos until I realized how well these work as a stain! It would have been a major headache to do a color and try to take it off and switch it 30 different times. Sorry!
When it came in the mail yesterday I played around a little bit to see how strong they are.

I wanted to see if I could make orange, I mixed equal parts Red & Yellow it didn't turn out very orange at all. I invented a new color "Ch-Ch Cherry Bomb!" and its my new favorite "red" ;)
My advice would be a little dab will do ya! If you want orange you should mix 1 part yellow to 1/4th of red.
The colors are very strong! The red and blue are powerful!

Because I was unable to do every color on my lips I wanted to at least demonstrate the variation of colors you can make with this awesome mini kit on my mixing plate

Here is an example of how bright the white is!
And here is today's creation: I am naming it "Merlife Ferlife"

I mixed a dot the size the tip of a toothpick of blue and yellow with the bright white on my lips pictured above & waaa-laaa "Merlife-ferlife"
The only con with these lip tars is that they are extremely transferable! Very messy but if you don't eat, drink, kiss anyone, or just don't touch your mouth at all...They stay!!
Saturday, March 22, 2014
I Do!

Thursdays bridal trial presented me with a few different looks she wanted to try and this one was my favorite!

She pulled it off so well! Beautious bride to be✨
Friday, March 21, 2014
Step by Step
I love my clients. I extra love them when they volunteer as models for me! One of my bridal trials last week let me do a step by step demo of getting wedding ready.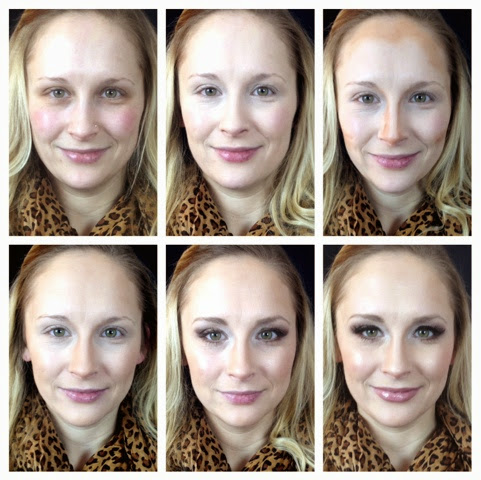 Step one) start with a clean fresh face and apply primer. We mixed MAC CC neutralize Prep + Prime with Smashbox Photo finish primer.
Step 2) apply foundation we lightly dabbed Kat Von D lock it foundation on the areas that needed extra coverage and did a light blow over of Dinair.
Step 3) contour! We used BH cosmetics camouflage pallet.
Step 4) blend blend blend
Step 5) Blush which doubles as a highlight Mac Azalea in the Afternoon, Eyebrows (Mac Fling) eyeshadow and mascara (Urban Decay Cannonball)
Step 6) Lashes (red cherry #43) eyeliner, mascara again, Mac Angel lipstick & boybait lipgloss also from Mac, lastly swept Nars Albatross down the center of the nose, on her cupids bow (above upper lip) and a smidge on her cheeks!
Tuesday, February 25, 2014
Snow White the Bombshell
Who said girls with fair skin can't go all out with dramatic eyes? Especially gals with frosty blues should always amp up your peepers! If you are feeling brave with the deep bold hues, just don't forget to blend, blend, blend!! A frosty white in the inside corners is always sure to make your eyes pop!

This Look's VIPs

Red Cherry Lashes #1
Kat Von D Trooper Liner
Mac Fantasy of Flowers Blush
Mac See Sheer Lipstick
Kat Von D True Romance Pallet in Saint
(Colors: 1, 5,6 &8)
Urban Decay Cannonball Mascara
The Modern Retro
The modern retro gal respects the history of pinup makeup, however understands the magical effects of glitter!! Glitter makes everything better and fabulous! ;) Dusting white/sheer glitter on top of a frosty white or vanilla eyeshadow is subtle yet powerful enough to make your eyes glimmer

This look's VIPs

Urban Decay Midnight Cowboy Stardust Eyeshadow
MAC White Loose Glitter Pigment
Kat Von D Trooper Liquid Liner
Urban Decay Revolution Lipstick in Fiend
Red Cherry Lashes #43
Monday, January 27, 2014
Hide-n-Seek Hair Extensions
Extensions can be a b!tch to get right sometimes, especially if you have very light or thin hair. Here are a few pointers/reminders for getting those suckers to look more natural and blend better.


Next, you want to brush through your hair, making the extensions blend together, section it again, and start curling your hair with the extensions in. Curling your hair with the extensions helps blend the ends together. By doing this you are hiding where your actual hair ends.
After you’re all curled you want to take the top section of hair and tease, tease, tease! You can get a teasing brush at your local Sally's Beauty Supply store. Your hair probably looks a bit weird right now so you want to smooth the top over the bird’s nest you just created. You don't want to get rid of the nest; you just want to hide it. Once you've smoothed some hair over your birds nest/rats nest, whatever you want to call it, you want to secure with your bobby pins.

The Goods:
You will need hairspray, clips to section your hair, a teasing comb, a curling iron, bobby pins, and extensions (real human hair only)
The Model:
Ronda has light blonde hair. It is fine but it's not what you would call thin. For her wedding in San Juan this March she wants to add extensions.
The Mission: Hide the extensions!
First you want to section your hair, If your hair is
shoulder length like Ronda's you will want to section it into 3rds. If you have
a lot of hair you may have to section it up to 6 times. For example: 2 on each
side and 2 in the middle. Most girls/women are fine with 3 sections: top layer,
middle layer, bottom layer. You may then start clipping in the extensions. As
you can see in the above picture (pre-curled/pre-teased) you can see both where
the extension tracks are as well as where her real hair ends. (Thanks for the
hand modeling, Dad J
)
Next, you want to brush through your hair, making the extensions blend together, section it again, and start curling your hair with the extensions in. Curling your hair with the extensions helps blend the ends together. By doing this you are hiding where your actual hair ends.
After you’re all curled you want to take the top section of hair and tease, tease, tease! You can get a teasing brush at your local Sally's Beauty Supply store. Your hair probably looks a bit weird right now so you want to smooth the top over the bird’s nest you just created. You don't want to get rid of the nest; you just want to hide it. Once you've smoothed some hair over your birds nest/rats nest, whatever you want to call it, you want to secure with your bobby pins.
& Wa-laa: Your final product should look similar to this!!
Friday, January 24, 2014
Favorite Brushes!!
This post is for Abbie!!!
Abbie recently asked me if there are any brushes that I cannot live without and here are my favorites!!!!


From left to right:
1. Lancome's Shadow blending brush. As youtubers call it "fluffy brush" this is the perfect blush to blend your eyeshadow like a master! #17
2. Lancome's Powder brush because it is big and AWESOME! #1
3. Mac Foundation brush #190 Its a staple for anyone's makeup bag and it does not have to be MAC I like Lancome's foundation brush just as much.
4. This brush my boyfriend bought for me and it was recommended by another MAC artist. I LOVE this brush I use it for concealer, primer, sometimes even shadow. It is such a versatile brush it is MAC's large shader brush #252
5. MAC Small angle brush #263 I strongly feel that this is another staple to have for makeup brushes. This is my number one favorite brow brush ever. I have tried other brands but I really like MAC's
6. MAC Large angled contour brush #168 this one is another multi use for me. I use this for blush, contouring, and highlighting. It may not be supposed to be for all of the above, but that's what I use it for :)
7. MAC Flat definer brush #212 I use this for all types of tricks such as cut creases and wings. This is a fun brush to have
The only reason why the first two brushes are not MAC is because I have had bad experience with these two as MAC brushes. I find that the MAC ones shed, which I hate.
Next is honestly the most awesome eye kit ever! Its Sigma's Performance eye kit! This kit is amazing and worth every cent of the $75.00 that it cost. Click the picture for more info on each brush that comes in the kit!

Monday, January 20, 2014
Best Face Forward
Linkedin is a fantastic networking tool especially for people that are in any kind of sales business. With that being said, it is very important to put your best face forward. You want to look professional, you want to look like someone that others would want to do business with.
There are a few key elements for getting your best headshot for your professional profile:
You need good lighting.
 A blank wall to take it infront of.
Professional attire.
A clean look; A fresh face is important you don't want to look overdone. Accentuate your best features.


There are a few key elements for getting your best headshot for your professional profile:
You need good lighting.
Professional attire.
A clean look; A fresh face is important you don't want to look overdone. Accentuate your best features.
If you want to add flare or something to catch prospective clients eye, throw in a red lip!
Also! Don't forget to have an awesome best friend to snap the pic for you! (Preferably the coolest best friend you can find! ha ha) Selfies are great for instagram and facebook but lets keep your LinkedIn as professional as possible.
Lastly treat that awesome friend with something delicious to thank her! This is a very important step!
OH! & Don't forget to text her and tell her how fabulous she is and how much you love her :)
Subscribe to:
Posts (Atom)