Thursday, March 27, 2014

Painterly Fun!

 
As promised! New post on my favorite new addition to my kit! Now I literally have every lipstick color possible!!! Mua-hah-haaa!
This is exciting stuff: You can get it for $29 at Sephora!
Awesome little kit for creative brains. Originally I had planned on creating a bunch of possible combos until I realized how well these work as a stain! It would have been a major headache to do a color and try to take it off and switch it 30 different times. Sorry! 
When it came in the mail yesterday I played around a little bit to see how strong they are. 
I wanted to see if I could make orange, I mixed equal parts Red & Yellow it didn't turn out very orange at all. I invented a new color "Ch-Ch Cherry Bomb!" and its my new favorite "red" ;) 
My advice would be a little dab will do ya! If you want orange you should mix 1 part yellow to 1/4th of red.
The colors are very strong! The red and blue are powerful!
Because I was unable to do every color on my lips I wanted to at least demonstrate the variation of colors you can make with this awesome mini kit on my mixing plate
Here is an example of how bright the white is!
And here is today's creation: I am naming it "Merlife Ferlife"

  I mixed a dot the size the tip of a toothpick of blue and yellow with the bright white on my lips pictured above & waaa-laaa "Merlife-ferlife"

The only con with these lip tars is that they are extremely transferable! Very messy but if you don't eat, drink, kiss anyone, or just don't touch your mouth at all...They stay!!



Saturday, March 22, 2014

I Do!


I love me some Kim K. Inspired wedding makeup. Can we all agree her makeup is ALWAYS perfect? Love it! 
Thursdays bridal trial presented me with a few different looks she wanted to try and this one was my favorite!
She pulled it off so well! Beautious bride to be✨

Friday, March 21, 2014

Step by Step

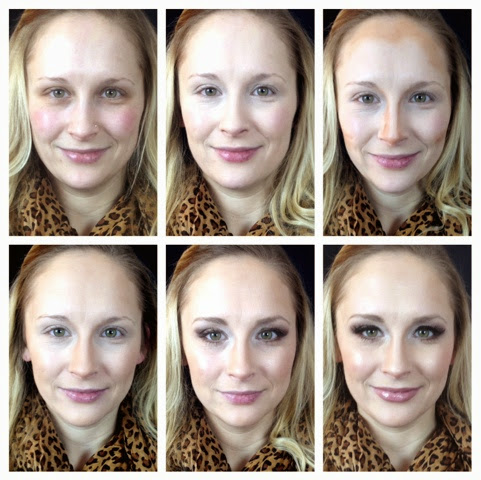
I love my clients. I extra love them when they volunteer as models for me! One of my bridal trials last week let me do a step by step demo of getting wedding ready.
Step one) start with a clean fresh face and apply primer. We mixed MAC CC neutralize Prep + Prime with Smashbox Photo finish primer.
Step 2) apply foundation we lightly dabbed Kat Von D lock it foundation on the areas that needed extra coverage and did a light blow over of Dinair. 
Step 3) contour! We used BH cosmetics camouflage pallet. 
Step 4) blend blend blend
Step 5) Blush which doubles as a highlight Mac Azalea in the Afternoon, Eyebrows (Mac Fling) eyeshadow and mascara (Urban Decay Cannonball)
Step 6) Lashes (red cherry #43) eyeliner, mascara again, Mac Angel lipstick & boybait lipgloss also from Mac, lastly swept Nars Albatross down the center of the nose, on her cupids bow (above upper lip) and a smidge on her cheeks! 

Tuesday, February 25, 2014

Snow White the Bombshell

Who said girls with fair skin can't go all out with dramatic eyes? Especially gals with frosty blues should always amp up your peepers! If you are feeling brave with the deep bold hues, just don't forget to blend, blend, blend!! A frosty white in the inside corners is always sure to make your eyes pop!
This Look's VIPs
Red Cherry Lashes #1
Kat Von D Trooper Liner
Mac Fantasy of Flowers Blush
Mac See Sheer Lipstick
Kat Von D True Romance Pallet in Saint
(Colors: 1, 5,6 &8)
Urban Decay Cannonball Mascara
 

The Modern Retro

The modern retro gal respects the history of pinup makeup, however understands the magical effects of glitter!! Glitter makes everything better and fabulous! ;) Dusting white/sheer glitter on top of a frosty white or vanilla eyeshadow is subtle yet powerful enough to make your eyes glimmer
This look's VIPs
Urban Decay Midnight Cowboy Stardust Eyeshadow
MAC White Loose Glitter Pigment
Kat Von D Trooper Liquid Liner
Urban Decay Revolution Lipstick in Fiend
Red Cherry Lashes #43
 

Monday, January 27, 2014

Hide-n-Seek Hair Extensions

Extensions can be a b!tch to get right sometimes, especially if you have very light or thin hair. Here are a few pointers/reminders for getting those suckers to look more natural and blend better.

The Goods:

 
You will need hairspray, clips to section your hair, a teasing comb, a curling iron, bobby pins, and extensions (real human hair only)

The Model:

Ronda has light blonde hair. It is fine but it's not what you would call thin. For her wedding in San Juan this March she wants to add extensions.

The Mission: Hide the extensions!

First you want to section your hair, If your hair is shoulder length like Ronda's you will want to section it into 3rds. If you have a lot of hair you may have to section it up to 6 times. For example: 2 on each side and 2 in the middle. Most girls/women are fine with 3 sections: top layer, middle layer, bottom layer. You may then start clipping in the extensions. As you can see in the above picture (pre-curled/pre-teased) you can see both where the extension tracks are as well as where her real hair ends. (Thanks for the hand modeling, Dad J )

Next, you want to brush through your hair, making the extensions blend together, section it again, and start curling your hair with the extensions in. Curling your hair with the extensions helps blend the ends together. By doing this you are hiding where your actual hair ends.

After you’re all curled you want to take the top section of hair and tease, tease, tease! You can get a teasing brush at your local Sally's Beauty Supply store. Your hair probably looks a bit weird right now so you want to smooth the top over the bird’s nest you just created. You don't want to get rid of the nest; you just want to hide it. Once you've smoothed some hair over your birds nest/rats nest, whatever you want to call it, you want to secure with your bobby pins.

& Wa-laa: Your final product should look similar to this!!


Friday, January 24, 2014

Favorite Brushes!!

This post is for Abbie!!!

Abbie recently asked me if there are any brushes that I cannot live without and here are my favorites!!!!


From left to right:

1. Lancome's Shadow blending brush. As youtubers call it "fluffy brush" this is the perfect blush to blend your eyeshadow like a master! #17
2. Lancome's Powder brush because it is big and AWESOME! #1
3. Mac Foundation brush #190 Its a staple for anyone's makeup bag and it does not have to be MAC I like Lancome's foundation brush just as much.
4. This brush my boyfriend bought for me and it was recommended by another MAC artist. I LOVE this brush I use it for concealer, primer, sometimes even shadow. It is such a versatile brush it is MAC's large shader brush #252
5. MAC Small angle brush #263 I strongly feel that this is another staple to have for makeup brushes. This is my number one favorite brow brush ever. I have tried other brands but I really like MAC's
6. MAC Large angled contour brush #168 this one is another multi use for me. I use this for blush, contouring, and highlighting. It may not be supposed to be for all of the above, but that's what I use it for :)
7. MAC Flat definer brush #212 I use this for all types of tricks such as cut creases and wings. This is a fun brush to have

The only reason why the first two brushes are not MAC is because I have had bad experience with these two as MAC brushes. I find that the MAC ones shed, which I hate.

Next is honestly the most awesome eye kit ever! Its Sigma's Performance eye kit! This kit is amazing and worth every cent of the $75.00 that it cost. Click the picture for more info on each brush that comes in the kit!
http://www.sigmabeauty.com/Performance_Eyes_Kit_p/pe01.htm